Choosing the right inspection method to detect cracks in concrete is crucial. It ensures accurate detection and proper evaluation of the structure’s condition, leading to safer and more durable construction.
Concrete is the most used construction material worldwide. It is a composite mixture of cement, water, and fine and coarse aggregates with or without different additives. Cracks can occur in concrete structures for various reasons including shrinkage, improper mixing and curing, poor quality of mixing, overloading, thermal expansion, freeze-thaw cycles, corrosion of reinforcing steel, and chemical attack in the structure. Depending upon the width and depth, the cracks can be categorized as surface cracks or deep cracks. If not analyzed properly, these cracks will affect the safety and normal use of the structure and might lead to increased maintenance costs and even catastrophic failure. By conducting frequent inspections and carrying out necessary repairs and maintenance, the life cycle of concrete can be extended, reducing maintenance costs and CO2 emissions.
It is important to choose the appropriate method of crack detection for concrete structures, as different methods have their own advantages and limitations. Visual inspection and hammer tapping are simple and inexpensive methods for detecting cracks, but they may not be effective in detecting all types of cracks. Non-Destructive Testing (NDT) methods, such as Ultrasonic Testing, Ground Penetrating Radar (GPR), and X-ray offer more advanced and accurate methods for Concrete Inspection. However, each method has its own strengths and weaknesses. For example, the GPR has a high capacity for detecting rebar and metallic objects in concrete structures, but it may have limitations in detecting concrete mix defects like air pockets, cracks, or delamination with air gaps below a few mm. On the other hand, ultrasonic testing is considered one of the better methods for detecting cracks and delamination in a tenth of an mm range inside concrete structures as it is highly sensitive to the presence of air.
Experimental studies using ultrasonic techniques, such as the pitch-catch mode by Elop Insight (EI) rolling scanner, have been performed to assess the capabilities of ultrasonic testing for detecting different types of cracks in concrete. In one of the tests, a concrete specimen is prepared with a vertical crack. The task here is to find the depth of the vertical crack below the surface. Traditionally, this is performed by placing two ultrasonic transducers placed on each side of the crack and measuring the time taken by the ultrasonic signal to reach from the transmitting to receiving transducer, which would be longer when it has to pass via the tip of the crack.

Figure 1: D-scan of a concrete specimen with a manufactured crack. The clear backwall echo shows that the specimen is 40 cm thick. The crack is vertical and down from the surface of the specimen. The tip of the crack is clearly visible about 10 cm from the surface in the image shown here. Also shown in the figure is C-scan from the fabricated crack showing the tip of the crack at about 40 cm from the start of the scan.
In one of these studies, a concrete specimen with different inclined cracks is used, and the scanner is rolled over the concrete surface to capture the ultrasonic data. The data was then converted into images using the SAFT method, and the results are analyzed in 3D and different tomographic views (B, C, and D) as shown in the figure below.
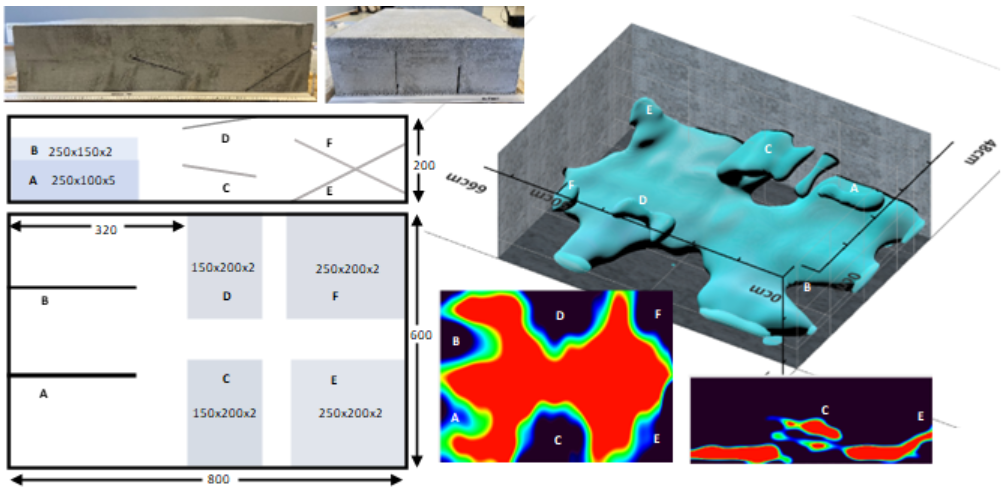
Figure 2: Drawing of the concrete specimen (left), a3D reconstructed image of the specimen using Elop Insight scanner (top-right) showing the cracks with different orientations, and a 2D C-scan slice of the backwall at 20 cm depth showing shadowing effects from all the cracks (bottom-center), along with a D-scan slice from two of the inclined cracks (bottom-right). The different cracks are labelled with corresponding letters A-F in the drawing and images. All the differently oriented cracks (A-F) are detected with the EI scanner, but the crack tip of the thinnest (2 mm) vertical crack (B) has a too low amplitude to be directly visible in the 3D image. This is due to its relatively low thickness combined with the unfavorable vertical orientation and <5cm surface proximity. Note though that its presence is revealed by a clear shadowing of the backwall in both the C-scan and 3D image which can be used to detect the presence of smaller footprint/weaker anomalies than what would be possible to image directly with the EI scanner.
The results show that the EI scanner can detect different inclined cracks inside concrete structures, demonstrating the effectiveness of ultrasonic testing for crack detection in concrete.

