How can one be certain of the integrity and as-built condition of concrete structures? Hidden voids, misplaced reinforcement, or undocumented conduits can pose significant risks to safety and project timelines. In construction, even minor discrepancies can lead to major issues down the line. Ensuring precise floor thickness is crucial for maintaining structural integrity and avoiding costly repairs.
With the Insight scanner, you can achieve unparalleled accuracy. This advanced rolling ultrasound scanner quickly and efficiently measures floor thickness across large areas, making inspections faster and more reliable.

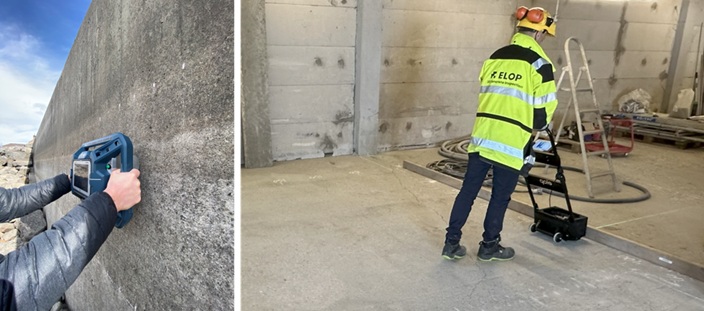
Figure 1. Insight scanner in practical use; measurement of the concrete wall thickness (left) and floor thickness accross larger area using Insight Trolley (right).
Together with our collaboration partners, we have worked on numerous projects where this technology has been used to verify the as-built condition and internal integrity of structures, with concrete thickness measurement as a central task. The goal of such inspections is to map embedded elements, identify internal features, and assess the overall quality of materials and components—without resorting to destructive methods.
Our inspection process typically involves three key phases:
- Calibration: The process begins by calibrating the equipment to the concrete’s properties. This crucial step provides immediate insights into material quality by measuring pressure-wave velocity in concrete. Sound concrete typically has a pressure-wave velocity of 3500–4500 m/s.
- Data Acquisition: The area of interest is systematically scanned to collect high-resolution 2D or 3D data. This produces a comprehensive digital model of the structure’s internal volume, allowing for a complete and detailed overview.
- Analysis and Interpretation: The collected data is processed and visualized. Cross-sections or “slices” (commonly known as B-scans, C-scans, and D-scans) are created through the 3D model, enabling technicians to examine internal features at any depth or orientation.
The results precisely reveal the location, depth, and geometry of embedded objects such as rebars, conduits, and post-tensioning cables. They also make it easy to determine the thickness of slabs or walls by identifying the strong “backwall” reflection.


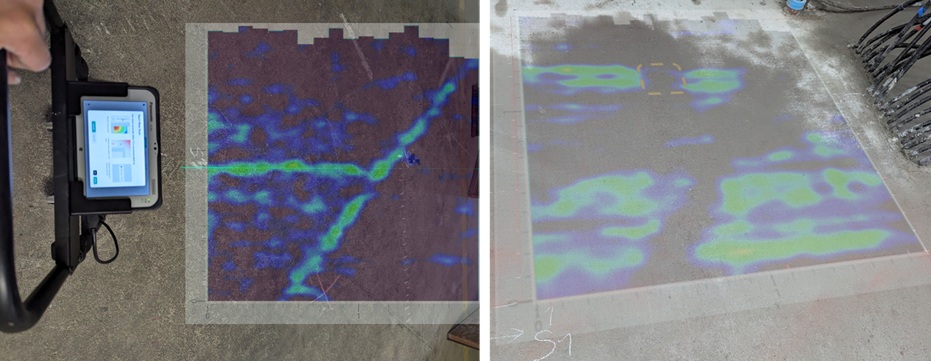
Figure 2. Scanned results (C-scans at different depths) overlaid on the concrete surface: showing the location of utility pipes (top left), slab thickness via backwall detection (top right), and large area detection of delaminations and other anomalies (bottom).
A key advantage of this technology is its ability to detect anomalies such as voids, delaminations, and honeycombing. By analyzing signal reflections from known features and structural boundaries, technicians can pinpoint specific areas that require further investigation.
This enables follow-up testing—such as core sampling or exploratory openings—to be carried out with precision, saving clients significant time and money while minimizing disruption to the structure.
Versatile Applications for Any Project
The ability to accurately map the interior of concrete makes the Insight scanner an invaluable tool for a wide range of applications:
- ✅ Quality Assurance for New Construction: Verify features and detect defects like voids, honeycombing, or delamination before they become major issues.
- ✅ Structural Integrity Assessments: Evaluate the health of aging infrastructure like bridges, tunnels, and dams -by detecting defects like cracks, delaminations, and voids in post-tesioning systems.
- ✅ Renovation & Retrofitting: Safely locate pipes, post-tensioning cables, and conduits before cutting or coring to prevent costly or dangerous damage.
- ✅ As-Built Verification: Create an accurate record of what’s inside a structure, which is crucial for maintenance and future modifications.
Build with Confidence
Ensure the safety, quality, and longevity of your concrete structures. Contact us to learn how our advanced NDT solutions can bring clarity to your project.


